Error message

  • Warning: "continue" targeting switch is equivalent to "break". Did you mean to use "continue 2"? in include_once() (line 1389 of /Library/Server/Web/Data/Sites/Documents/jonathansblog/includes/bootstrap.inc).
  • Warning: "continue" targeting switch is equivalent to "break". Did you mean to use "continue 2"? in require_once() (line 341 of /Library/Server/Web/Data/Sites/Documents/jonathansblog/includes/module.inc).

Warning message

The service having id "facebook_widget" is missing, reactivate its module or save again the list of services.

Technology

Pi Powered Presentation Screen

One of the first developments as Head Teacher at my new school, Ivy Chimneys Primary School is to introduce a large LED screen in the foyer area to display information about the school and to share children's work.

After a summer of exploring lots of digital signage solutions, many of which were very pricey and were either far too complex for what I needed to achieve, or didn't quite fit the bill.

My specification was simple:

* affordable solution, meaning high impact on learners, low impact on budget.

* the screen needs to reflect the life of the school, displaying key messages and to share children's work.

* maintaining the screen needed to be simple, so that uploading new 'pages' is quick and easy.

* both children and staff are able to administer the screen.

I'm a true believer in 'pupil voice' and the very reason schools exist is to provide opportunities for children to learn new skills. One of the best ways to achieve this is to involve them in the process of learning at every opportunity. I am also intent on building a community of learners who are thinkers and who are able to reflect on their successes and be self-critical on finding improvements too. 

When children feel success, they should have a place for celebrating and feeling proud of their achievements. This screen is just one of those places.

The Solution

It occurred to me that the Raspberry Pi costing just £25 coupled with a large 32" LED screen would be one of the cheapest options available. Of course the Raspberry Pi alone isn't the solution, because it is just the computer and operating system. The Raspberry Pi has several HUGE advantages:

- cost effective - only £25.

- tiny size (footprint no bigger than a credit card)

- negligible power consumption (just 2 watts)

- onboard HDMI graphics adaptor which makes connectivity very straightforward.

- runs Raspbian Wheezy which is a flavour of Debian - a very reliable operating system. 
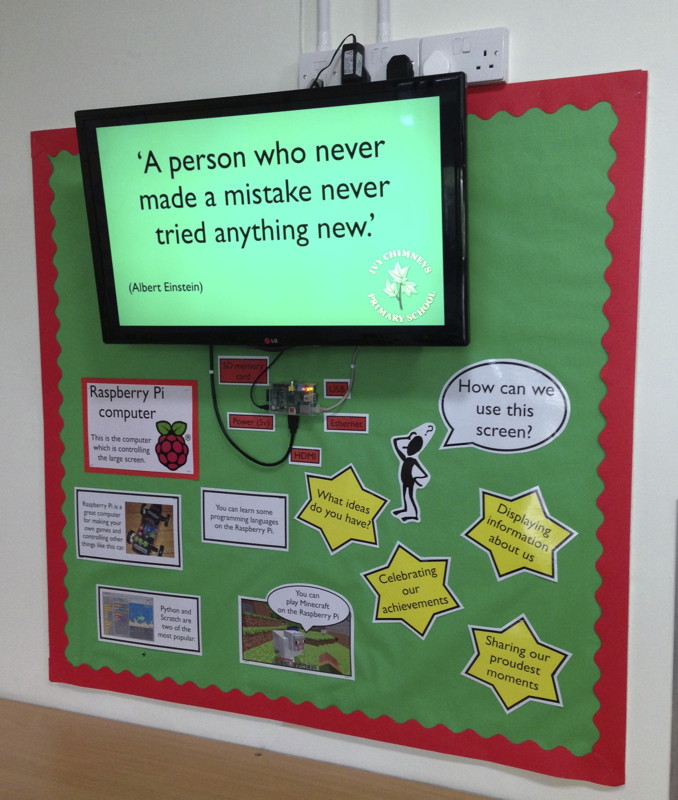
I bought an LG 32" LED HD TV from Richer Sounds, Romford with a wall mount bracket. It has all the standard connections but of particular importance are the two HDMI connectors. A standard HDMI cable connects the Raspberry Pi to the TV. 

I did note that the TV also has a USB socket, which provides enough power to run the Raspberry Pi, but unfortunately this port only provides power when the screen is on, i.e. not in standby. A real pity since the whole project would then only need one 240v plug socket.

When I started this project, I knew I wanted children to be able to engage with the technology and an earlier decision was to display the Raspberry Pi rather than to tuck it carefully, out of sight, which would have been so easy to do.

Instead, I choose a transparent case, and mounted it on the wall beneath the screen. As you can see in the photograph, I have even labelled the ports to make the wall display as informative as possible. Only 1 week into the new term, and children have been drawn to want to find out more about how it all works.

Software

After much testing of different operating systems, starting first with the RaspBMC, I opted to run the Debian Wheezy installation. The RaspBMC is an XBMC Media Centre system which offers plenty of advantages. I initially used the Screensaver plugin to load images from a folder and present them based on the timing settings selected. This would be an ideal solution, especially since RaspBMC also supports AirPlay technology enabling the screen to take a AirPlay feed from an iPhone or iPad.

However, having found a similar solution using the X windows system in Raspbian Wheezy, I felt that I had greater flexibility in using the Pi to perform other tasks, not just the screensaver. I also had greater control over finding a mechanism of being able to access the folder of images across the network and reloading the image 'set' during the slideshow.

In the end, Raspbian Wheezy was the operating system of choice. I enabled a couple of options from the 

raspi-config page

Start desktop on boot? - YES

Enable SSH? - YES

Display

I discovered that an image viewer application called 'feh'  would be ideal for this project. Feh can run from the command line and has several configuration settings to tell it how to behave. Within the config you simply point feh to a folder from which to display images. Simple.

1. First install feh.

sudo apt-get install feh

2. To start the slideshow, simply run the command:

/usr/bin/feh --quiet --recursive --randomize --full-screen \ --slideshow-delay 5 /home/pi/frame/photos/

the commands are fairly self-explanatory. The digit '5' tells feh how many seconds to wait before loading the next image. 

Because the application 'feh' runs in the X windows environment (startx) the mouse cursor was visible on the screen whilst the photos were being displayed. I found a way around this, by installing 'unclutter'

sudo apt-get install unclutter

Uploading photos to Pi

This was solved by using a pre-packaged PHP application called KCFinder. What's really nice about this tool is its ease of install and simplicity of operation. All I wanted was a tool which was web based, enabling anyone with a web browser to upload & delete images on the Pi.
First I needed to install the Apache webserver.

apt-get install apache2

and also the PHP interpreter with GD for graphics support.

apt-get install php5-gdI then downloaded and copied across the KCFinder files.

I configured the KCFinder config file to ensure the upload directory was pointing to the same folder that feh used to load the images for slideshow.

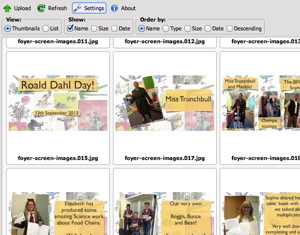
Bingo! When I go to the Pi hosted web address of KCFinder, I can simply drag and drop images into the browser window to upload. What's more, as the images are uploaded, thumbnails are created which allows me to see which image is which.
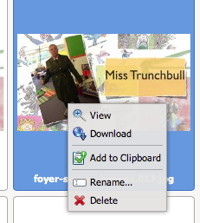
I can also delete images from this folder, so when it comes to deciding which images to keep in the slideshow, this is quite straightforward.


One thing to be aware of, however, is that feh loads its images on startup, when the application is first run. This means that if you add images to the folder, feh doesn't know about them unless you restart the application.

This led me to script feh. I needed to do this for several reasons, one, so that it automatically starts on boot. Second, to enable me to restart after adding or removing images from the slideshow folder.

I ended up with two scripts. 

starting the slideshow:

#!/bin/sh
#
# Script to run Digital Signage Solution using Feh
# jonathan@learningspaces.net
#
# hide the cursor after 15 seconds
/usr/bin/unclutter -idle 15 &

# Start slide show
/usr/bin/feh --quiet --recursive --randomize --full-screen --slideshow-delay 7 /xxx/xxx/foyer/upload/files/ &

exit 0


reloading the slideshow:

#!/bin/sh
#
# Script to run Digital Signage Solution using Feh
# jonathan@learningspaces.net

#export DISPLAY=:0

# Stop the currently running Slide show

kill `pgrep -f "feh"`

sleep 10s

# Start slide show
/usr/bin/feh --quiet --recursive --randomize --full-screen --slideshow-delay 7 /xxx/xxx/foyer/upload/files/ &

exit 0

And that's it. That should give you a fully working digital signage system based on a simple slideshow of images.

There's more development that I'd like to explore, including using some push switches on the GPIO ports to run a set of scripts for perhaps displaying a particularly screen. Maybe the week's house points chart, or weather information etc. I also have a Pi Camera which I would like to hook up, and perhaps it could be accessed through pushing another button? Who knows. With the Raspberry Pi powering the screen, the possibilities are endless, unlike many of the corporate solutions which tend to be quite finite.

Exciting possibilities ahead. If you have a really fabulous idea to develop the Pi Screen further, do let me know by adding a comment below.


More products can be found on the Farnell website, see Vishay and Panasonic

Simple, Smart, Small Bluetooth Music System to your Speakers

One of my bug bears is having plugin my phone into a cable to listen to music. With a cable plugged in to the phone, it becomes "tethered" to my desk and therefore don't have quite the same freedoms to use it as a phone.

The Avantree Roxa Bluetooth Receiver works brilliantly if you have a set of wired speakers or perhaps a hifi system which is set up on the opposite side of the room from where you happen to be sitting.

The Avantree is so easy to setup with only two very logical steps:

1. Plug the Avantree into a wall socket.

2. Pair your bluetooth capable device with the Avantree. 

and that's it!

The Avantree also has a USB socket which provides sufficient power (1 Amp) for charging iPhones, iPads and any other device that can be charged over USB.

This really is a very capable device and one that would be at home in any home or office.

I got this from MobileFun where there are lots more smartphone accessories.

JBL OnBeat Micro Lightning Speaker Dock

Last week, I ordered a speaker dock system for my iPhone 5 with the lightning connector. Nearly a year after the release of the iPhone 5, there are still only a few speaker dock systems using the now-not-so-new lightning connector.

JBL are renowned for designing speaker systems which produce high quality sound. This is no exception.

As a Head Teacher, I've been in lots of classrooms and observed lots of lessons and fun activities where teachers want to play music from their iPhones, but instead resort to the complexities of having to copy the sound file to a computer in order to burn a CD. Schools need kit like this to make teaching and using ICT resources so much simpler. Dock your iPhone and press play should be as difficult as it gets.

I'm really liking this speaker dock. It comes well equipped with an AC supply adapter, USB port on the back for connecting other devices, perhaps with the 30-pin dock connector, and also a 3.5 stereo jack as an input from another audio source. This is a very versatile speaker docking system.

Removing the cover on the base of the unit reveals a battery compartment, requiring 4 AAA batteries for it to operate wirelessly.

This is a must have item for any home or classroom!


Fitbit - tracking your way to a healthy future

If there was ever an intuitive and well packaged product, the Fitbit must surely be it. Whenever I hear Fitbit, I do think of Wizbit, a children's television programme for children. Like Wizbit was the entertainment programme for children, Fitbit is the tracking tool for getting and staying healthy.

Curiously enough, I was setting this device up with my 4 year old nephew. Whilst he wasn't reading all the onscreen questions during setup, he knew exactly how to get through the config pages and use it. Furthermore, he understood the small screen display on the Fitbit itself.

So what is Fitbit?

There are three parts.

1. The wearable Fitbit device

2. The Fitbit app 

3. Fitbit website (optional)

The Fitbit device is a neat little package, no longer than four centimeters and two centimeters across. It comes with a clip-on case which not only protects the device but is super grippy and holds onto the clothing and gives you a confidence that this isn't going anywhere. It's also incredibly light, and you wouldn't notice carrying this around with you. 


The Fitbit device pairs with a smartphone, using the Fitbit app. It is compatible with Windows and Mac computers, syncing wirelessly and displaying data collected through a browser based 'Dashboard' interface. For smartphones and handheld devices, there is a Fitbit app, available for some Android smartphones, iPhones, iPads, iPod Touch.

As you can see in the screenshot (right) a whole raft of data is captured and tracked. What I love most, is that the synchronisation happens autonomously and discreetly. You wouldn't be aware that it's happening which is a very good thing, because that's not what I care about. What I'm interested in is analysing and comparing data as it is collected.

I love the graph that's generated (see below) allows lots of parameters to be compared and contrasted. The 'Very Active Minutes' is particularly enlightening.

I'm really delighted with this new gadget and it will be the perfect companion to clip to my belt to track my daily activities. Not only does it capture physical activity, but also rest time too. You can add drink stops too, but you'll need to manually add this data to the app or website.


I cannot wait for tomorrow. I'll clip on in the morning and get on with the jobs that lie ahead. 

I'm going to try cycling, motorcycling and driving as well. I'll be interested to note whether Fitbit can distinguish between the vibration on a bike, road surface and actual steps (walking.)

In summary, I don't think I've ever used a product which is as intuitive as Fitbit. It's great. 5 minutes of setup, straight out of the packaging (which has also been given quite a lot of thought!) and I was up and running. Given this device is technically quite complex in terms of small screen = minimal user interface, synchronising wirelessly yet small enough to be light and portable, this really is quite an achievement. To the untrained eye, this is both seamless and gorgeous. I love it.

Are you interested in getting a Fitbit

Travel Tidy Cables

Whenever I travel with technology of any kind, I always find myself carrying a nest of handy cables and adapters. Clearly, when travelling light and with hand luggage, smaller and lighter are the two key words.

So here is my latest technical addition in that quest for light-weight and compact.

Raspberry Pi Retractable RJ-45 Ethernet Cable

Despite most hotels offering wifi solutions. I still find myself plugging in occasionally. This is exactly what you need. 

Tidy Desk, Tidy Mind!

My MacBook Pro connects directly to an Apple Cinema Screen. Whilst my Cinema screen is somewhat old with a standard DVI connector, my MacBook uses the Ultra-cool Thunderbolt interface. 

As many Mac fans will know, the early Cinema screens has a multitude of connectors all clustered together at the end of it;s single, reasonably bulky cable. I have a DVI to Thunderbolt connector, but I disliked the array of other connectors sprawled across my desk - quite unnecessarily and each connector was a perfect habitat for dust. 

Having spotted this Thunderbolt extension cable, I wanted to see if this solved my issues. 

All I have now on my desk are three connectors. Power. Ethernet. Thunderbolt.

If you are looking to do something similar, this is what you are looking for!

Dr. Bott 2m Mini DisplayPort Extension


(ps. this doesn't prevent the nest of cables tucked away, tangled but crucially out of sight, behind the desk!)

iPad Mini case

The iPad Mini is designed to be carried everywhere. It wants to just slip into a small bag. Now that my wife uses hers to read, it gets put in her handbag wherever she goes. As with all Apple products, they look gorgeous naked and dreadful when fully clothed in a huge unwieldy case.

I think we have discovered the perfect case which offers practical protection from scuffs and scratches whilst being carried, to enabling its natural beauty to be showcased whenever in use.

This is the Encase designed pouch in a charcoal wool finish. Snug, sleek and very well protected.

More iPad Mini cases can be found online here.

Energy to Go

... is what is said on the box!

This Energizer battery pack, originally designed to recharge iPhones, iPads, iPods or any other device requiring a USB charging adaptor. It's a very small and light power pack which has two USB ports on one side. This means it can charge two devices simultaneously. This photo shows me using the Energizer pack to power the Raspberry Pi computer. 

I have plans to be able to power a Raspberry Pi computer in a remote location, where mains power isn't available, for example on my allotment, and use the Pi to monitor environmental conditions, such as temperature, rainfall, sunlight and humidity. I'm currently running tests to see what the expected battery life is for the Energizer power pack. I'll post the results of these tests on my blog in due course. I do know that it will power the Raspberry Pi for 8 hours quite comfortably.


I've also used this power pack to charge up my iPhone and iPad mini. it's really effective and because it is light, doesn't' add any significant weight to my shoulder bag.

Would definitely recommend getting one of these, especially if you have a smartphone that requires charging at least once a day. 

Find it online under the iPad mini accessories page on the Mobile Fun site.

To Dock or not to Dock...

This Apple iPhone 5 dock from Mobile Fun is one of the first sporting the new Lightning Connector. When I travelled to Las Vegas during Christmas, I noticed that Bose have launched a speaker system incorporating the new dock connector too. 

The dock comes with a Lightning cable which is very handy as it provides another cable - useful when you rely on just the one that came with the phone.

I'm pleased that the dock is heavy enough to make it feel quite solid, yet light enough to pack away and travel with.

The only criticism is the lack of support for the iPhone 5 when it's sitting on the connector. The iPhone is reliant on the support from the connector - which just isn't man enough. It's really very flimsy and will, at some point, break. The dock probably needs a support behind the connector to take the weight of the phone. Time will tell.

Docking needn't be so hard: Lightning Adaptor anyone?

Despite being a through and through Apple fan, devotee, geek(!) I still feel slightly annoyed at the continual changing of cables and connectors, not least because of the sheer expense at replacing cables, connectors and the inconvenience of not having a wealth of the right cables at any given moment. Having recently upgraded my iPhone 5, I, of course, got heaps of 30-pin cables, which are of less use right now. Please form an orderly queue....

Then there are the devices that actually HAVE the 30-pin connector built right into them. I have an Alarm-Clock with the 30-pin iPhone dock connector and also a Phillips docking speaker system with the same connector. Not much can be done here other than use an adaptor. Not great, but a solution nevertheless.

It's not necessarily pretty either, but it does do the job. Sound quality is uninhibited and this is still an iPhone 5 charger too. My wife's iPhone 4 can still be used in the docking speaker as well. Maybe the best of both worlds?

Categories:

a-JAYS headphones for tangle-free listening to iPhone, iPad, iPod Touch

These a-JAYS are unusual in that I wouldn't have chosen the brand ordinarily. I'd have opted for more familiar, bigger brands such as Sony, JVC etc.

However, I was completely taken by surprise at how brilliant the sound quality both in range and depth. These in-ear headphones are perfect size and help to block ambient sound leaving the purity of the sound resonating from the ear pieces.

Bass sounds were particularly delightful.

The cables running to each ear piece are fairly unique too. a-JAYS have opted for a wide flat cable to avoid horrid tangles. It seems to work too. There is nothing more frustrating than reaching for headphones only to spend a good couple of minutes untwisting and untangling cable. These really work and I wouldn't hesitate in purchasing another set in the future.

These headphones are perfect for listening to iPod Touch, iPad, iPhone, Kindle Fire. There are other Kindle Fire HD accessories...

Categories:

The trouble with WGET... is stopping those pesky output files

I think I must have been plagued for about 5 years with the age old issue of WGET requests creating unnecessary and unwanted empty files following a WGET request. WGET is tool for retrieving files via http, https and ftp via a command line interface.

I use WGET extensively for running cron jobs across the various blogs and websites running on my server. Each time the cron job is run, an empty file, i.e. cron.php is created. If a cron.php file already exists, it creates another cron.php 1, cron.php 2, cron.php 3 etc.

You can imagine after just a few days having hundreds of these breeding like wildfire.

Stupidly, rather than fixing the problem, I created a solution. To run another cron task which periodically deletes the cron files, 

rm /Users/jonathan/cron.*

This kind of works, but then I started using WGET for a whole heap of other tasks, and yes, the output files mounted up.

Half term holidays affords me the space to find these solutions, and it's a simple one.

When structuring a WGET request, simply add

--delete-after

to the request, i.e.

wget --delete-after http://www.southwoodfordnhw.info/cron.php

Works perfectly and as described. Relief at last.

iPhone 5: a case in point

I'm thoroughly delighted with my new iPhone 5. I say new, but I've had it a whole month since the release date on 21st September. 

With previous iPhones, I've always maintained that to place this beautiful piece of kit inside a plastic case, would be like adding wrapping a Ferrari in bubblewrap, only to preserve the immaculate bodywork. Personally, an iPhone is an everyday device. It will get used, abused and scratched from time to time.

However, ever since dropping and smashing the rear cover of the iPhone 4, and having never really been able to replace the lens cover properly to provide outstanding photographs, I've been more hesitant than to just go 'au naturale'. Therefore I've plumped for a 'bumper' style case just to provide protection to the edges and the glass front face should the worst happen.

The Gear4 case is probably one of the sleekest available. It seems to blend in well with the original design. Not a bad choice for an iPhone 5 case.

Categories:

Wire-less Care-free Type-more Keyboard

For a while now, I've been searching for the perfect wireless keyboard. Not necessarily for any serious typing, a full size one is needed after all. However, there's something very neat about this particular keyboard, its size.

Originally I thought I'd use this for armchair control over my home entertainment system, a 24" iMac with wireless mouse. It means I can send commands and controls to the Mac using the key commands across the room using its Bluetooth connectivity. It works very well at this and I'm delighted with it.

I then tried pairing the keyboard with my iPad, iPhone, and now the latest, my little Raspberry Pi computer. The Raspberry Pi needs a bluetooth adaptor, but that was easy to source and hook up. Using an iPad 3 keyboard has made such a difference to typing information effortlessly.

What I love most about the keyboard is its function. It comes with a USB cable (for charging) and a small pouch with a lift-and-over end for securing the keyboard. A really nice device, perfect for use in the home and for traveling. Fab.


A Life in Sync

iCloud, Dropbox, IMAP are now the tools of choice for keeping my digital life in constant sync with all the devices I use from iPad, iPhone through to Macs at home and work. It's cross platform, so works on Windows and Linux computers too. Ever since the DVD, USB stick, CD, hard disk, floppy disk, tape and before that, punched tape systems, we've had a desire to carry data around with us. It served us well, but now, at long last we can negate the need to carry anything with us at all.

Dropbox has revolutionised where and how data is available to me whichever and wherever the device is located. Dropbox simply maintains a local folder on 

each computer that you use. As you add files and folders to the 'Dropbox' folder, Dropbox quietly works seamlessly to migrate that information to all theother devices.

What I love most is that Dropbox is transparent, seamless and autonomous in operation, and gone are the days of forgetting to click the 'sync' button which so often caused much heartache when you neglect to do something so simple.

Why not create yourself a Dropbox folder to keep your life in sync.

1. Create a Dropbox account

2. Install the Dropbox software on your iPad, iPhone, Mac, Windows, Linux systems and you're good to go.
 
An added bonus of Dropbox is the ability to share files between friends, family and colleagues. Even collaborating on single files works well. 


iCloud is even more transparent, and actually intends to only keep your own data synchronised between devices. It doesn't have the ability to maintain a folder of files yet it does ensure photos, music, books, apps, calendars, contacts, notes and mail are maintained across all your personal mobile and desktop devices. Again, an awesome technology which simply works seamlessly. I have no complaints it just works.
 
If you're not already using it, you should. Ensure you have upgraded to iOS5 and you're away.


Also, read more about Share-Gate SharePoint migration for all your education and business needs.

Google Docs and Gold Challenge

This week, I've been busy using Google Docs to create an online spreadsheet that can be updated by our teaching staff at Kings Road Primary School as we begin our Gold Challenge, raising money for Kids Inspire.

What was particularly revealing is that not only does Google Docs allow multiple users to work with the spreadsheets, but it also allows this data to be published in other sites. I played around with using the Graphs function to create a thermometer come totaliser graph as an easy way for our pupils to follow the progress so far and it is this graph that I'm able to publish, keeping all the other sheets containing the names of pupils, private. Essential for any organisation where you don't wish to publish sensitive information.

I've written a news article about the Gold Challenge  and was able to insert a live view of the distance achieved so far. I'm really impressed by just how easy this is to achieve. This is a live view of the distance travelled by the staff and pupils in our school, so far.


Look! No wires. Learning about electricity without wires.

Having attended the Design and Technology Show this weekend at Birmingham's NEC, I came away with an amazing product which I think revolutionises our understanding of electricity and electrical circuits whilst unleashing our creative minds to make some cool things.

It's black and comes in a small jar.

The product is a glue-like paint which just like paint, can be used on any surface you can think of. It dries like glue and is adhesive, which means it can be used to hold things together. However, it also has conductive properties, which makes the product really exciting when combined with electrical components.

As a teacher, teaching electrical circuits to young children often leads to many misconceptions. Whenever we see a circuit presented in a book, very often it's shown as either circular or rectangular. That's difficult to translate into a bulb, battery and a bunch of wires that take on a life of their own.

Over at the Bare Conductive stand I was captivated by Bibi Nelson who demonstrated painting two parallel lines on some paper. She attached an LED light to one end of the parallel lines and placed a 9V battery which straddled across the two lines at the other end. The LED lit as electrical energy transferred through the paint to the LED. Brilliant. 

Of course the conductive paint can be used to make any shapes you like and so the concept of a standard rectangular or circular circuit is replaced by an understanding that circuits simply need to be complete and join up.

Not only can the paint be applied to paper, but it can be painted on walls, concrete, glass, fabric and even skin! (though you'll need a pot of Bare Skin instead!) There are numerous ways of connecting the painted surface to buzzers and batteries, perhaps using paper clips, adhesive copper strips, crocodile clips and even snaps for fabric projects.

Bare Paint is very versatile and there are some really cool projects that you can have a go at making on the Bare Conductive website. Take a look for yourselves and see if there's something you think pupils would be equally amazed by.


Untie your shoelaces and let's get learning

Today pupils at Kings Road Primary School had the opportunity to take part in a brief online video conference with Educational professionals in Silkeborg, Denmark. It was a little bit impromptu and so the pupils didn't have any preparation time, which I've often found is the best moment for real learning to take place. After initial introductions, Kings Road pupils were simply asked to name one thing that is fab about their school.

Top on their list was the use of new technologies in learning and how it is used to support learning in the classroom. They pointed to numerous examples which was not only insightful but reflective on the impact iPads had made on them.

Next, they mentioned the Strand Organisation, now in its second year. This is 'stage not age' organisation and the pupils are very confident to speak about the benefits this brings. They are particularly appreciative that learning is more focused to their needs and are challenged appropriately without feeling like they are being kept waiting for others to catch up or left feeling vulnerable that they simply aren't able to keep up.

Something else that was mentioned, was the Library. Often considered as a resource that new technologies will soon replace. We have strong counter arguments against that, one of which is that the children really believe in the library and the need to use both fiction and non-fiction books effectively.

As the conference came to an end, Stephen Heppell, who chaired the conference offered something new that the pupils in Denmark have been doing for a while. 'Shoeless learning'

Effectively this simply means children taking off their shoes as they enter the classroom or learning space. Why? Well, we didn't get time to discuss that with Stephen or the Educational professionals, so the pupils immediately set off to find out for themselves. Following a link to 'Shoeless learning' and some further googling for more information, it was clear they were curious to see if it could help them too. The scientists in the group spoke of controlled experiments which they could try on different learners within the class. Does shoeless learning have more of an impact on boys than girls was one question they posed.

Remember the pupils weren't in class at this point, it was their break time, and yet here they are in this 'in-between' learning moment questioning, researching, reflecting, debating and developing a clear set of arguments with which to challenge their class teachers in an attempt to convince them to at least give it a trial. Without provocation, they presented some of the opposing reasons for not 'going shoeless' one of which is health and safety and not treading on a staple or drawing pin etc. These all need mitigating of course, and the risks managed - but of course the pupils totally appreciate that and can immediately find alternative solutions. It's what's termed a 'no brainer' ! This important work continued at lunchtime too, there was no stopping them and yet it all started with a simple question.

Who wouldn't want their school's to be full of learners learning about learning? Today, the pupils honed their skills in...

  • questioning
  • researching
  • reflecting
  • debating
  • convincing

It does lead me to wonder just how much of the curriculum we teach in schools is already scaffolded and pre-prepared. I bit like pre-cast concrete I suppose, heavy, difficult to move, built in set sizes to fit a specific design. However, we haven't argued much against it, because learning does take place but I very much doubt that this is anywhere near as much as something self-directed by pupils with the wisdom and facilitation by the teacher. In the past three to four months, our curriculum has undergone a significant review with a real emphasis on developing Key Skills around a pupil-centric curriculum. Today was proof that this has an enormous potential as pupils really begin to fly as collaborative learners.

I felt proud and privileged to watch learning unfold in a very seductive and engaging way.

Apple iPad Case

At last I've ventured into getting the proper Apple iPad Case. It has many advantages, one being that it fits snuggly to the actual form of the iPad making it appear super sleek and thin.

I love the rubbery texture which makes the case very grippy.

I love the simplicity of the design too, making it possible to stand the iPad in a range of different orientations.

The best arrangement is set up with the screen standing on edge and a bluetooth keyboard connected making it a very portable and capable computer.


Using the iPad with the on screen keyboard is also very usable when orientated flat with a 15 degree incline. I love the way that the onscreen keyboard doesn't appear if a bluetooth keyboard is paired and active. Very intelligent thinking which is what makes Apple the great brand that it is.


This case for the iPad and also several iPad 2 cases can be found easily on the web.

Synology DiskStation Audio Station

I've had the DiskStation running for a week now and I keep finding a whole set of new features. The device is a fully fledged media server offering a streaming service for a variety of media types, photos, audio, video and even security cameras.

I'm interested in how this device can be used in the school environment to share both learning resources and the digital creativity work that the pupils produce. The latter is such a big issue for me because so much work is created by pupils, yet there are few opportunities where this work can be shared, nevermind even accessed by a wider audience. I think the Synology DiskStation is about to change all that.

Audio Station

Starting the Audio Station service is easy. Simply find the application in the Control Panel and check the box.

Files to be shared are uploaded using the File Browser window. You can establish your own file system should you wish, or simply point your upload to a folder containing the media you wish to upload and the whole process is managed efficiently and effortlessly.

A progress bar shows what items are in the queue and also upload progress.

Once uploaded, you can view the collection of folders and files through the File Browser window.

However, this is only the storage of this media. What about being able to play this media across the Ethernet or Wireless network?

The DiskStation software allows the media to be streamed to device in several ways. Using the web interface, the media can be played through the Audio Station software which is essentially presented with a similar interface to iTunes. A neat solution for cross-platform compatibility since the display will appear identical on a Mac or Windows PC. Furthermore, in a school setting, this requires less training in order to use the software.


What I REALLY like about the DiskStation however, is the way in which multiple devices can access this same playlist. Here is the view on my iPhone 4....


This is staggeringly good. It makes me reflect on how we can simply do away with CDs being used here and there, skipping and jumping because the scratches from heavy and continued usage. Plugging a computer, an iPhone, iPod or an iPad into a sound system would just work. All of this works across the WIFI network.

The DS audio app is the player for the iPhone/iPad/iPod and is a free download from the iTunes Store.

...and finally. What better way of accessing shared music from a central source, than to make it available to the iTunes Streaming Service?

Here is my iTunes application on my Mac listing the contents of the iTunes library...

...and below, accessing and playing the "Shift Happens" film. 


This DiskStation is staggeringly good and so effortless to implement, administer, control and access.

Already, I am uploading videos that pupils have made, films that pupils are watching for the From Screen to Page writing programme and audio that might be used around the school and across the curriculum.

Learning really can be this exciting.

I can't wait to begin exploring yet another feature, which will probably wait until the next blog update!

Synology's DiskStation NAS has arrived.

Synology's new DiskStation DS211 arrived last week. I've been interested in NAS (Network Attached Storage) for some years, and have found a few units which live up to what I consider are the demands of being a useable NAS.

Here is my quick starter for 10:

  1. Fast. Reading and writing data has to be snappy. Since the NAS is likely to be a large central store of a variety of data, audio, video, software installers, backups, fast read/write speeds are essential. Particularly with video when multiple users are watching two different films whilst a TV programme is being recorded.
  2. Access from multiple platforms. Essential in a setup involving multiple operating systems. On my computer alone, it triple boots into Mac (much preferred) Windows (urggh!) and Linux (Mmmm)
  3. Be expandable. My demand for storage space increases exponentially. Simply buying a NAS drive only for it to be full within a year isn't cost effective. A NAS really ought to have two drive bays for expansion.
  4. Quiet and energy efficient. This is one of few devices that is left on 24/7, and for obvious reasons needs to use as little energy as possible when idle.

In addition to the above, this enclosure received a good review in a recent MacUser article and I was interested in the customisable applications that extend the capabilities of the NAS. There are some neat tools that enable the iPhone to connect to the drive and access the media that is stored. More on this in a future blog article.

So, the first job was to install the hard disks into the NAS enclosure. NAS units bought directly from Synology are empty enclosures leaving the consumer to choose which bare drives to buy separately according to their needs.

Opening the white plastic case was simple enough, the side panel slides and lifts away. Bare drives are screwed to the chassis using standard screws, included.

Once powered, the NAS drive springs into life. Make sure the device is plugged into your network router or hub.

Unlike most products, scanning the network to find the dynamically assigned IP address of the drive is usually process, but as I discovered, not only do you need to scan the Quick Setup Guide, but also use the CD to run the Synology Assistant software. Both were easy to navigate. A Setup Wizard guides you through uploading the Disk Station Manager software. It takes less than 2 minutes to install everything.


Once complete, settings for the DS211 are changed using the web browser interface. I like setups using web browsers because it means settings can be changed remotely on any computer without having to download proprietary software. Nice.

Before any of the apps can be configured, a volume must be created. Incidentally, I ticked the 'check hard disk' option and this looks like it might take some time. So, that's where I'll leave this blog. Check back for more later...


Very few ports on the back. 1Gbit Ethernet, 2 USB and Power. Simple.


iPad Arc Aluminium Stand

I adore the iPad and there are plenty of websites, blogs and tweets confirming that I'm not alone. I shall spare you yet another repetition of why this tactile and accessible technology bridges the gap between the techno geeks and the technophobes. However, one essential addition to the iPad wealth of accessories is the iPad stand. I quite often use the iPad on a desk top, or more recently on a transatlantic flight, sometimes to watch films, music videos, gaming or just browsing. Whilst touch screens work are far more comfortable to operate when flat on a table top, conversely they are more comfortable to look at when stood horizontally.

This iPad stand works brilliantly on flight tray or desk top. It's not only stylish, designed and built using the same material as the iPad casing, but it's also incredibly light and easy to transport.

I wouldn't have travelled without it.

Inspirational Learning Spaces in the Classroom

When I walked into school this morning I noticed that our Year 5 and 6s have started their technology projects. What was even more inspiring was the paper used to protect the worktops. Large sheets of architectural design plans formed a fascinating backdrop on which the pupils worked.

According to the class teacher, the pupils were engrossed in understanding the plans and continued to ask pertinent questions about what they represented. What better way than to provide a technically rich workspace to stimulate ideas and the development of solutions to problems.

I loved it and am a big fan of these approaches to really engage pupils. Fabulous stuff! 

Role play can be so powerful to create the right mood and atmosphere for learning.


iPhone Power Station - power to the people and phones

The iPhone travels with me everywhere I go. Most days it gets a lot of use from listening to music, taking photos, checking travel and weather reports, accessing email, diary, administering servers and my home (more on this later!) Some software on the phone drains the battery more than others, such as using it as a phone, or the GPS and Google Maps where data is constantly being downloaded. Often the iPhone struggles to even last the day without a top up or connection to my computer. Some days, this just doesn't happen as I'm constantly moving here there and everywhere.

I know about the battery 'jackets' you can buy for the iPhone, but I hate them, mostly because they make the phone chunky and who wants to lose the beautiful design?  No, I needed something I could just plug in, even momentarily and didn't rely on needed to be connected to the mains. There are hundreds of iPhone accessories out there, but few really make the grade.

The Mobile Power Station seems to be a pretty smart solution. It has a dock plug which is simply connected to the bottom of the iPhone with a simple battery level indicator to show how much charge is left in the device. It charges the iPhone and on a full charge will completely charge the phone in about 30 minutes. Of course the phone still works albeit with something piggybacked onto it.

When using Trailguru on the iPhone for tracking distance travelled on my bike this weekend, the iPhone rarely manages to complete a 2hr cycle because the GPS and screen power is just so draining for its battery. However, with the Mobile Power Station plugged into the iPhone which is mounted in the handlebar cradle it's just perfect. It's very inexpensive too.

Charging is simple, simply connect to a standard iPod/iPhone charger and if piggybacked into the iPhone, the charger will charge both.


Installing the XCarLink adaptor for iPod, iPhone - VW Golf V (MK 5)

The XCarLink adaptor is simply a box which interfaces between the iPod or iPhone and the CD radio head unit. The adaptor unit about the size of four match boxes and has two cables leading from it. One of the cables connects directly to the iPod or iPhone, the other to the CD changer port on the back of the head unit.


These instructions explain how I fitted the XCarLink adaptor into my VW Golf V (MK 5) TDI SE (2005)

The cable from the adaptor box plugs straight into the available CD changer socket on the back of the head unit. Before connecting, I ran the cable from the bottom of the centre console to behind the CD radio unit. In order to do this, the cigarette lighter and ashtray needs to be removed.

  1. Remove the gearstick cover. It pops out easily with little force needed.

  2. Beneath the cover reveals two screws. Remove these and the ashtray and cigarette lighter unit can be lifted up and out. You'll need to disconnect the cigarette lighter cable and ESP cable (if fitted.)

  3. I identified a suitable spot for locating the XCarLink interface unit beneath the ashtray and cigarette lighter unit.

  4. I routed the cable from the XCarLink interface box to the iPod / iPhone down a gap between the carpet and the centre console.

  5. Once all the cables are in place, switch on the CD radio and test the setup before putting the gearstick cover, centre console and dashboard back together.

  6. I use a piece of velco (the soft furry piece attached the iPhone) and the hooks attached the the dashboard. The iPhone isn't very heavy and the velco works well to support the iPhone in an upright position and within easy sight and reach for both the driver and passenger.
     

This was an easy install and took less than 45 minutes to complete from start to finish.


Good luck and enjoy!


UPDATE
I've checked out new iPhone accessories since posting this blog to find a suitable mounting system for the iPhone. See my later blog entry for more.

Pages

Subscribe to RSS - Technology